Contact angle (Contact angle) is the tangent line of the gas-liquid interface made at the intersection of gas, liquid and solid phases, and the angle θ between this tangent line on the liquid side and the solid-liquid junction line, contact angle measurement is the main method of surface performance testing nowadays.
Overview:
Contact angle (Contact angle) is the tangent line of the gas-liquid interface made at the intersection of gas, liquid and solid phases, and the angle θ between this tangent line on the liquid side and the solid-liquid junction line, contact angle measurement is the main method of surface performance testing nowadays.
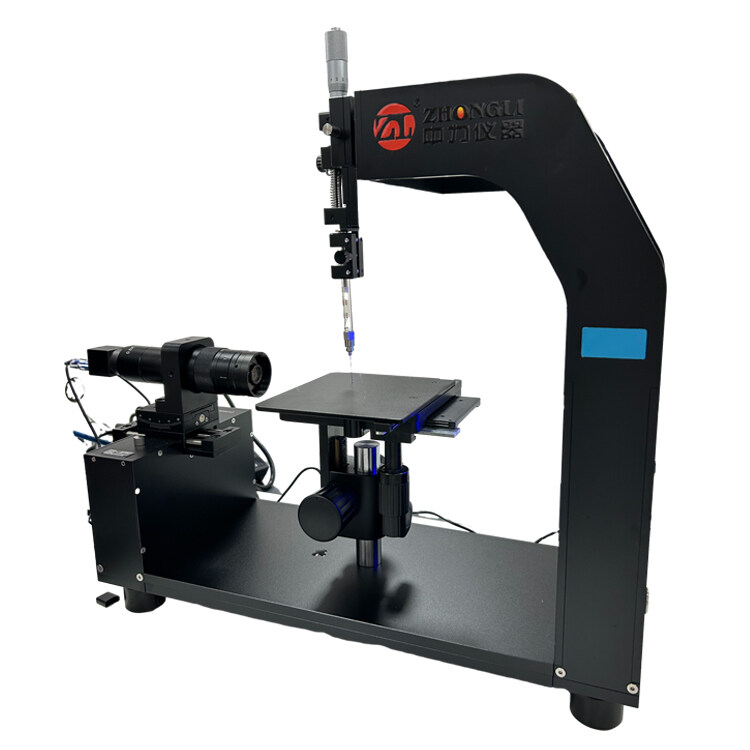
ZL-2823C standard contact angle measuring instrument adopts the principle of optical imaging to measure the sample surface contact angle, wettability, surface interfacial tension, surface energy and other properties by means of image contour analysis, the equipment is cost-effective, comprehensive, and can meet various conventional measurement needs, and has been widely used in many universities, institutes and enterprises.
Application:
Contact angle measurement is used in a wide range of industries and has become an important instrument for assessing surface properties in areas such as mobile phone manufacturing, glass manufacturing, surface treatment, materials research, chemical and chemical engineering, semiconductor manufacturing, coatings and inks, electronic circuits, textiles and fibres, and medical and biological applications.
Analysis of the Adhersion of liquids on solid surfaces and assessment of the homogeneity and cleanliness of solid surfaces.
Principle:
As shown above, the contact angle measuring instrument is mainly composed of five major parts: light source, injection unit, sample tables, acquisition system and analysis software, and the equipment adopts the principle of optical imaging.
Light source adopts intensive LED cold light design, uniform luminescence, image cleaning and long life;
Injection unit adopts micro manual knob feed, with stable drops and high precision;
Sample tables adopts three-dimensional manual fine-tuning platform, flexible operation, accurate positioning, and the sample stage can be customized according to the actual sample size
The acquisition system adopts black and white imported CCD camera, with stable shooting, clear and reliable images, and the lens adopts German industrial grade imported configuration, with 0.7-4.5 times magnification adjustable and no distortion of imaging;
The analysis software is powerful, with one-key automatic fitting capability, with the most advanced international fitting method, to meet the accurate fitting of various droplet forms;
Specifications:
|
Equipment specifications |
|
|
Device Host |
|
|
Dimension |
550mm(L)×196mm(W)×485mm(H) |
|
Main Machine Weight |
11KG |
|
Adjustment Of The Whole Machine |
Whole machine level test/adjustment |
|
Power Supply |
|
|
Voltage |
100~240VAC |
|
Power |
20W |
|
Frequency |
50/60HZ |
|
Space |
|
|
Platform Size |
130mm×150mm |
|
Maximum Specimen |
250×∞×60mm |
|
Sample Stage Adjustment |
Three-dimensional manual adjustment (can be upgraded automatically) |
|
Front and back adjustment manually, stroke 60mm, accuracy 0.1mm Left and right adjustment manually, stroke 35mm, precision 0.1mm Up and down adjustment manually, travel 80mm, accuracy 0.1mm |
|
|
Camera System |
|
|
Maximum Image |
4000(H) x 3000(V) |
|
Maximum Frame Rate |
120fps (upgradable to higher frame rates) |
|
Sensor |
SONY 1/1.8″ |
|
Spectrum |
B&W/color |
|
ROI |
Custom |
|
Display line Width |
Custom |
|
Exposure Time |
Custom |
|
Power Supply |
5 VDC USB Interface |
|
Transmission |
USB3 Vision |
|
Microscope Head |
|
|
Focal Length |
100mm |
|
Magnification |
8X |
|
Resolution Scale |
6~12um |
|
Light Source |
|
|
Type |
Single wavelength industrial LED (cold light) |
|
Wavelength |
470nm |
|
Light Field |
Φ50mm |
|
Light Point |
96 grains intensive type |
|
Lifetime |
50000Hour |
|
Injection System |
|
|
Drip Method |
Direct feed precision micro syringe |
|
Control Method |
Manual control |
|
Drip Accuracy |
0.1μl |
|
Syringe |
High-precision gas-tight syringe |
|
Volume |
1000μl |
|
Needle |
0.51mm all stainless steel superhydrophobic needle (standard) |
|
Software |
|
|
Contact Angle Range |
0~180° |
|
Resolution |
0.01° |
|
Contact angle measurement method |
Fully automatic, semi-automatic, manual |
|
Analysis Method |
Suspension method, stop-drop method (2/3 state), bubble capture method, seat-drop method, seat-needle method, insert plate method |
|
Analysis Method |
Static analysis, automatic liquid increase and reduction dynamic analysis, wetting dynamic analysis, real-time analysis, bilateral analysis, forward and backward angle analysis |
|
Test method |
Circle method, ellipse/slanting ellipse method, differential circle/differential ellipse method, Young-lapalace, wide-height method, tangent method, interval method |
|
Surface Free Energy |
|
|
Test Method |
Zisman, OWRK, WU, WU 2, Fowkes, Antonow, Berthelot, EOS, adhesion work, wetting work, spreading factor |
|
Data Processing |
|
|
Output Method |
Automatic generation, export/printing of EXCEL, Word, spectrogram and other report formats |
Accord Standard:
1.GB/T 24368-2009 (detection of hydrophobic contaminants on glass surface);
2.SY/T5153-2007 (Determination method of wettability of reservoir rocks);
Product Features:
The world’s most advanced contact angle analysis method can meet the accurate fitting of all kinds of liquid droplet imaging, including the unique differential ellipse and differential circle special liquid imaging fitting methods;
Liquid and solid surface wettability, more accurate analysis of the surface actual wetting situation;
© Dongguan Zhongli Instrument Technology Co., Ltd.
Leave your inquiry, we will provide you with quality products and services!
Please fill out the form below to request a quote or to request more information about us. please be as detailed as possible in your message, and we will get back to you as soon as possible with a response. we’re ready to start working on your new project, contact us now to get started.
